Monday, July 16, 2012

It is Completed and what a Challenge...

Especially when it turns out looking like this!.   If you have been following my blog while I was working on this quilt, you know that I ran up against a few little obstacles...sewed a block upside down...sewed a block together in the wrong direction,,,didn't make enough blocks of one group, stuff like that.  But the top is completed and it will be soon on its way to be quilted.  Would I make this quilt again...probably, I think.  It really is not that hard to put together except that there is a lot of pre-cutting and sewing and re-sewing. And you really, REALLY have to be organized and have your blocks sorted as outlined in the pattern.    I used 2.5 inch strips (mostly bali pops) and everything came from my stash.   The second time around, I would use smaller strips, maybe 2 inch so that it would not turn out so big,  and maybe I would not make it so scrappy.  Just 3 or 4 solid colors or prints that read as solid.  Anyway, it was a blast.  I look forward to seeing everyone's quilt who participated in the group soon!


Wednesday, June 13, 2012

Almost Done...

Well I have 2 more rows to add on and the top is complete! Unfortunately my design wall is not big enough to accommodate the size of this quilt so I had to get a little creative in order to take a halfway decent photo.  It is draped over the sofa.  I don't know how I am going to take a picture when I add the last 2 rows.  I don't have that much wall or floor space.  The blocks for the last 2 rows are up on the design wall and will get attached before the weekend is done.  I am going to put 2 borders on it instead of 3.  I purchased 3 yards of 108" backing because I just didn't want to piece the back.  The top is going to finish at about 96".  I think that is a record for me.  So this is the last photo before the big finish.

Thursday, June 7, 2012

progress, slow and steady.

just a little update.....i got the baby quilt quilted with a simple panto and i really like how it turned out.  it is called blossom by willow leaf studios.  the reason i chose it is because it looks sorta like a 3 leaf clover (tying in the trinity) but it is soft and curving so it softens up the hard lines of the design of the quilt.  it is an open pattern, not too dense, not too open...sorta like goldilocks--fits the quilt pattern just perfectly.  i have the binding to finish up by hand still.  gonna work on that this evening (if you can call 9:11 p.m. evening!) some and then hope to finish it and do pictures tomorrow.....and, i want to get the borders onto the large one and get it loaded on the machine too.....watching 2 two yr olds, 2 four yr olds, a 5 and 6, 8, 10 and 11, and 12 yr old tomorrow, so will see how much actually gets done.  i am heavily counting on my 15, 16, and 18 yr old daughters to help watch the kids so i can quilt....

i am curious how all the rest are doing?

Monday, June 4, 2012

Can you see it?

I was doing so well...trying to keep all of the 9-patch blocks organized and labeled.  My 3 year old grand daughter came to visit and one of us tossed the box that I stored the blocks in while playing around and I had to reorganize the entire thing.  It took a while but I got it done.  So I started on making the chunks again.  Thought I had the top half of the quilt done.  I put the top right hand side up on the design wall.  I was really proud of myself and was looking at it in awe when I spotted it.  I stitched one of the blocks up side down...  Block B5... row one...first block.  At first I thought it was an optical illusion, so I kept looking  from afar and then I got up close and yep...My right side told me to leave it...no one would notice.  My left side (totally anal side) said are you kidding?  Take it down and fix it! What can I say...I am kinda anal that way and it is a gift.  So I fixed it.  The difference is noticeable ... to me it is.  Can you tell the difference?

 The Mistake

The Fix

Tuesday, May 8, 2012

Now I See Progress...

What a difference 2 completed blocks can make...I can see it coming together slowly.  I am going to take a pic of each block, because I can see myself sewing a block together backwards or upside down.  So please bare with me as I go through this challenge.  I am not going to bore you with a picture of every single block, but will wait until I do a few more chunks.  I was worried about the flow of the purples and greens and the dark purple-blues, but there seems to be enough definition going on.  And it is definitely scrappy.  I think if I decide to make this again, I will stick to just 3 or 4 fabrics.  So here is A-2 and B-2 together on the design wall.


Saturday, May 5, 2012

My First Big Block

I made a commitment to stay in today and work on completing the S blocks.  I have been dragging my feet a little, but now I see light at the end of the tunnel.  I am still constructing P blocks but I had enough to put the first block for me together - B2.  Having this up on the design wall will give me incentive to get busy...I am off to complete more blocks.

Thursday, April 19, 2012

border decisions.....hhhhmmmmm.....

i have been BUSY!!!  it is finally warm and not windy enough to blow me away anymore!  yeah!!!  that means it is time to sit outside on the porch and enjoy spring.  it also means yard work, and getting things ready for planting.  i won't plant until the first of may because even still we can get snow and have a freeze.  strange to think of weather like that in the mojave desert huh?  i sure don't understand why the weeds never freeze and die though.   so, been busy with the hula hoe and rake and planning what is gonna go where in the new garden i am preparing.  i have fibromyalgia and feel like my limbs are going to fall off.  quilting has taken a bit of a backseat.

i did manage to get the large quilt and the baby one done to deciding on borders in time for the wedding and reception for my daughter last saturday.  of course i had already bought the fabrics that i thought would look magnificent.  i even went as far as to CUT the strips that i would need for BOTH quilts because they looked so beautiful in my minds eye. so, i excitedly laid it all out and i really don't think it was what that quilt was asking for at all!  gee whiz!!  was that ever a huge mistake and waste of beautiful fabric.   i found a piece of fabric that may work to help resolve it all, or i may just forego borders....i had to let the frustration dissipate so that i can look at it again with fresh eyes.  i think i just might be ready for doing that tomorrow....coz i know i am still not ready today......however, finding that new piece of fabric has soothed my frustration and has gotten my curiosity peaked.....yeah!!!  i love the quilting process!!!!

Thursday, April 5, 2012

Are you Ready to get Chunky?

 
  1. Hopefully you had a fun time sewing the 9-patch units together.  I found it went pretty fast if I powered through the larger sets first then 'rewarded' myself with sewing the smaller number sets.  (Don't know "WHY" sewing fewer units is a reward but hey if it gets me going who am I to argue with myself!)     Now the real fun begins.  When you get to this stage it is amazing how fast the quilt top sews itself together- all by itself, seriously just kidding.  I did have one that seemed to come together by magic but in reality it was late night sewing.

My Hints/Suggestions for this part:
I start by making the units for the middle first.  I know it is more normal to make all of one's blocks before assembling the top but..... I have made several of these and don't like to wait.  I make the "C" row first so I can hang it up as inspiration (or it can mock me into sewing the rest)
Then I do the "B" rows (both same blocks at the same time) sew the row and then attach to the middle row.


Again the top grows up a bit and it is easier to add one row to each side.
I suggest if possible that you take a picture of your block/row BEFORE joining additional blocks/rows.
I swear you can see mistakes easier looking a photo then you can in real life.
Ask me how I 'Know"


I have been dying to show off this oopsie, funny part is I didn't see the big block out of place first.  I found a smaller section where I had a 9-patch in wrong.  My grand daughter (age 4) pointed out the biggie.  I 'see' it now in the photo, I swear it wasn't there in real life--lol

Take your time on the chunks they are just sewing larger 9-patches together.  We can all do that- Right!!

The last one I made I did the borders per instructions.  I really like how it turned out.  My first quilt I chose not to border and I like how it turned out too!  My third one I improvised and used fabric I had on hand and I like how it turned out also.  Point is do what you want.  I am making one now that is 2 1/2" strips and I will do an applique border of some kind on it.

I have cut kits to do at least 3 more (in my life time, not necessarily right now)

I am a fan of the strip dies for the GO, so maybe there is a 3in scrappy in my future.  No plans to border that one-  I may do the math and change my mind-    cw

whoop whoop!!!

all 25 blocks are now done, as well as all of the blocks for the baby quilt!   all the kids are gone til about 8 or so, so i am off to get these rows built!  then, get them put together. one right after the other. my BEST plan would be getting to load this baby onto the long arm early tomorrow evening or early saturday morning and to have both of them quilted by sunday.  wish me luck!

posting i can do, pictures, not so much.

i am coming along just fine on this project, but it is getting a bit monotonous.

i do have a hint to share though in sewing all of your P's into the A, B, Cs.  i am notorious for turning pieces and sewing them together wrong.  in this quilt that REALLY makes a difference in the design.  i do not know how often i have to unstitch a seam to turn back to the right orientation.  until i came up with THIS method.

i lay out the 9 P's that make up the larger 9 patch paying CLOSE attention to the proper layout and orientation.  when i am making more than one block i stack them.  because i am doing scrappy it lets me make sure there are not two same fabrics touching if at all possible.  then, i pin all three of the blocks together in the row at each seam.  for the top set for the first row i put one pin in the lower left corner.  for the second row i use two pins, and the third row, 3 pins.  this is so helpful when keeping track of the layout!  then, i sew them up and pin the paper saying what A, B, or C they are and then when a pile is done, i go press them......

of course pictures would help you "see" what i am talking about.....ok, i will attempt it when my kids come home to help since i will be using my phone to do it with and technology is NOT my forte.

off to go make those last (4) 9 patches so that i can then start putting THOSE together.  just to lay it out will be really rewarding!

Wednesday, April 4, 2012

Where is Everyone???

Is anyone sewing?  I need some incentive and inspiration to keep going.  Let's see some posts and or pictures :0)

Saturday, March 31, 2012

Making a little progress

Well I have sewn and cut enough strip sets to make a few test blocks.  These blocks are P13.  They turned out pretty good.  Blogger flipped the picture. I have 2 more strip sets to complete and then I will be ready to really get busy on making the blocks.  I decided to use a dark blue with hints of purple and green as the dark celtic stripe.  I like the way they look.  Keep sewing.

Wednesday, March 28, 2012

We have Stripped and Sub- Cut, now what? Let's Make 9-patches!

I seriously suggest you have an area dedicated to this part of the project.  There are several ways to keep track of your 9-patches.  I labeled folders with the "P#" and the amount.   If you are using different colors then the pattern make sure you use your 'colors' when you label.  
I have also used paper plates to keep each section organized, baggies would work too.  The "KEY" is to do what works for you.

Of the 6 gals who live body started this, one is on to the 9-patch stage, 3 are still sewing strips, one was a NO SHOW- lol and the other just bought her fabrics last night.  (I am not going to admit how far behind I am- lol)

Good news is:  You are done with cutting, it is chain sewing from here on out-  whooo whooooo!

Disclaimer:  Several of my gals are doing yardage of four fabrics (three color and a background)  I have the GO cutter and Strip Dies and have helped cut out the strips.  I will do a separate post showing how to  use yardage.  I think we will have some beautiful quilts to show off soon.

Thursday, March 22, 2012

progress, slow but sure.

there sure is a lot of prep work in this method!  i know that once i get to start making some 9 patches (today!!!)  i am gonna be thrilled, but until then i am feeling like i am spinning my wheels and using lots of time in the organization stage.

i have all of my strip sets sewn, and now sub cut as well.   all went back into their little baggies.  nice and together and organized!  love it!

i sure would encourage you to do the sub cutting a bit at a time or you could really do some carpal tunnel damage!  i used the june taylor fringe cutting ruler.  you know, the one with the slots every half inch?  but it is only about 7 inches high, so it is REALLY manageable.  LOVED using that.  i cut many sets of 4 stacked, but it was really easier on the cut with sets of 3 stacked instead of 4.

i have started bundling my P sets now.  they are nesting in a basket.  on a little snip of paper, i put P1 and how many i needed.  i put what S's i used and how it looked.   and pinned all the bits together.  i think i have thru P6 batched up and in the basket so FINALLY i am gonna get to make some 9 patches today!!!  YEAH!!!!!!  can't wait!

lynne

Wednesday, March 21, 2012

I am off and running...

Well, there is a whole lot of cutting and stripping going on.  I have made some strip sets and cut the subsets.  This is a lot of work and the urge to rush through it is strong.  But I need to take my time with this and work in a consistent pattern or I will get bored and you know what happens then.  Bundled up and thrown in a basket until whenever.

So, this is a wedding quilt for a family friend, who actually got married last October.  She asked for a quilt and was willing to wait for it, but I want to get this made for Jennifer. It will be a scrappy quilt with primarily purples and greens.  The background is going to be made up of various neutrals.  I am still trying to decide on the dark color for the celtic stripe.  Deborah used black in her pattern, and that would work for me.  I have enough of the Michael Miller blackest black to do this but some of the purples are dark and I want the stripe to standout with the other colors.  Any ideas for a different color???  Here are a couple of pictures.  The first picture is turned around - don't know what happened, but you can see some of the fabric.  They show some of the color variations as well.  I think this is going to be a very pretty and colorful quilt.  I am excited.   Thanks Cheryl for sharing.  I had no idea what I was going to do and when you posted about this quilt, the light bulb went on!  Robin


Monday, March 19, 2012

can i just start already??!!

i'v finally got my baggies of strips all done and set up for my starting to sew them together.  they're  just sitting there mocking me while i have to go about normal life and birthday parties and st. patricks day stuff still (a family of irishmen and women lol) and...and...and.  today started spring break and besides my own 5 kids, and my 2 grandsons (ages 4 and 2) i will be having another 2 and 4, 5 and 6 yr old join us for the week.  you think i am gonna be getting to get those strips together?  you bet i am!!!  where there is a will, there is a way, and boy howdy, i have the will!!!

we are also on the switch of winter to spring clothes duty.  like that isn't an enormous task in and of itself!  BUT, now that the extra 4 are gone for the day, and the grands too, it is FINALLY my turn!  i am going to go lock myself away in my room and sew at least a few sets together.....there are just so pickin many of them!  and, when i add that i am making the center 21 or 23 blocks square (i forget how many) so that i can make a matching baby quilt to go along with the wedding quilt--oh my gosh!!!  why do i do these things to myself??!!

the big pile of zip locks looks daunting, but it is never gonna get smaller if i don't get off here and get started on the sewing is it???  my problem is committing to which sewing machine that i want to use.  i just got a new to me 1948 singer 15-91 and it is just begging me to stitch with that.  the problem there is that i have to move stuff around to accommodate it, and that also postpones my stitching.....what's a girl to do?  make a cuppa lemon lift tea and mull it over whilst eating some amazing homemade shortbreads.  that's what!


Tuesday, March 13, 2012

Let's get started..... Are you ready?

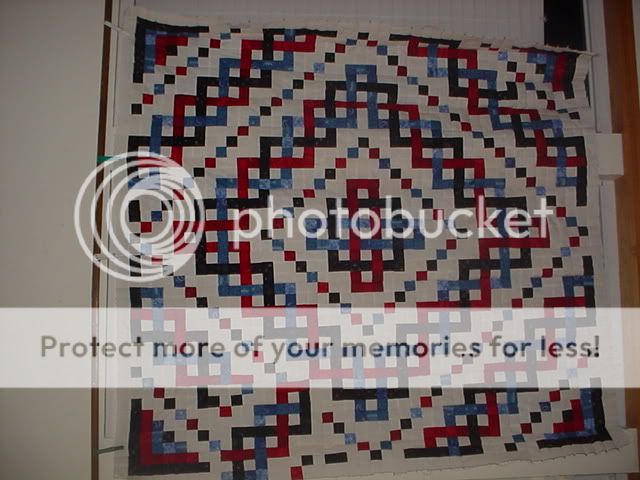
First as a disclaimer, this Knot A Long will not help you if you don't have the pattern.  It is not my intention to give away Deborah's hard work.  I am going to assume that everyone participating has the pattern in hand and is ready to start.  (Nice thing about blog posts is they are forever and late comers can just jump in anytime.)

Here we go-  On the back of the pattern we are given fabric requirement for three different sizes.  You choose what size strips you want to work with.  For this quilt I am going to use 2 1/2"  strips.  I am also going to go scrappy.

Things to remember- this is based on a fat quarter (18 x22)  Width of Fabric strip will be 22"

I had my class write down what 'colors' they were going to work with.  Then they found the # of fats needed.  Everyone was encouraged to shop from their stash.  Several have decided to use yardage and just three prints and a background.

One of the things I LOVE about class quilts is each is so different.  If you choose to use yardage, figure out which size strips you want and purchase accordingly.

I have the GO (and BABY) die cutters and strip dies for 1 1/2, 2" and 2 1/2.  Of the 9 quilters present tonight 4 of us have our strips cut, the other gals were waiting to see this step before getting their fabric.

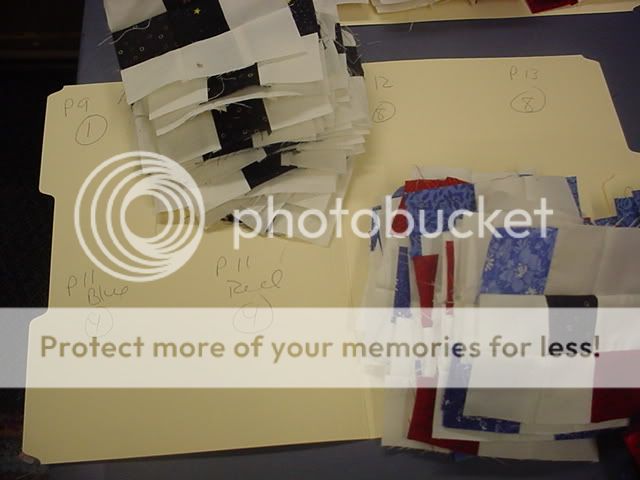
On page 3 of the booklet the strip sets are explained.  For our Home Work this session we are going to sew strip sets.  Students are encouraged to make a system for keeping their sets organized.
I prefer to used a piece of copy paper for each group S1 through S11.  I label the page as follows:
S1.  (color- hers was Blue, mine will be Purple), next is Two (2) background- hers were cream, mine will be also, then you need to figure your number of groups by what size strip you are using.  In my case my first page would be:      S1    Purple,  Cream, Cream   (11sets)   88 sub-cuts      For our group class the gals are encouraged to get their 3row (strip sets) sewn and we will sub-cut next meeting.

I have found that having a separate piece of paper labeled for each strip set (3row) helps.  I first deal my colors out to get random in each page.  For example on S1 I need 11 groups with purple, cream, cream so I will use many different purples to get my 88 3rows (sub-cuts)
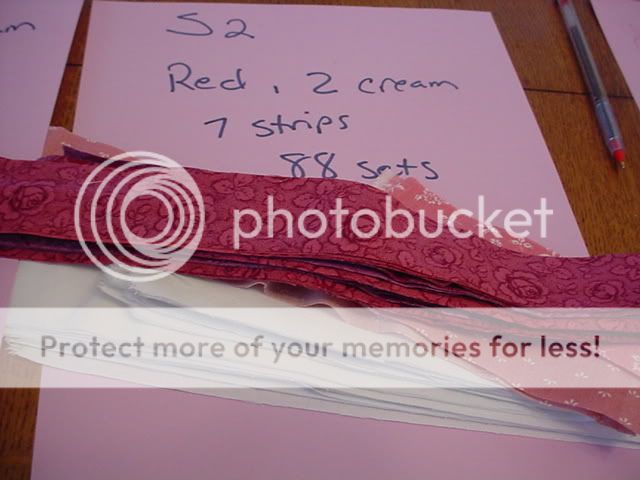
You can't tell from from this  photo but here I used 1 1/2" strips and needed 7 different reds to get my sets.
I use the same papers for organizing my sub-cuts.


I found it helpful to use a card table to keep myself organized, I found that after I dealt out the strips, I could just pick up and sew sets when I had time.
Then when I had all the sets for one page done I could iron and sub-cut.

Working on this in different phases helped keep me from getting board.  I also found it moved pretty quickly b/c I wanted to see each page go from strips to sets and then to sub-cuts.

Read your direction pages at the front of your booklet and get use to the terms.  Keys to remember are make a chart of what colors you are using so you don't get confused.  Find a way to organize your strip sets and/or sub-cuts so you can pick up where you leave off.

On Page 3 items S12-S16 only need a few of each, you really can do these with the left overs from S1-S15.  I would suggest that you do NOT make these the same. (It is tempting to just use the same material  for each BUT it will look better if you scrappy even these few sets up.)

Our group is meeting 2nd and 4th Tuesdays,  next time we get together we will sub cut and work on stage 2.

I hope to have pictures to share of our progress.  (I apologize I forgot my camera tonight)

Pick your fabrics, (I hope you can bust some stash!!) Cut your strips, Sew your sets (S)

Next time we will sub-cut our 3rows and start our 9 patch-units.

Leave a link to your blog post on Celtic Knot in your comments.  I will figure out how we can play along together,  I am looking forward to see many beautiful future heirloom quilts.

Thursday, March 8, 2012

Welcome to the Knot-A-Long!

I am a little slow getting this going.  I know there will be many new beautiful quilts using Deborah's pattern!

I have already made three and have a couple of others strip cut.
My quilting group has ordered patterns and we will start next Tuesday.
I hope to get a few of the gals to start blogging and join us.

I have two more patterns to give-a-way,  one entry for joining this new group, another entry for taking time to be guest poster and a third for doing a link on your blog inviting your friends and readers over to this Blog.

and.... just to make it fun,  in one of your comments, let me know what colors you are planning to do, who your would make the quilt for OR if you are just following to see the fun.

If you are in SW MO and need help finding the pattern my friend Pam has ordered  them to sell at local quilt shows.  Her e-mail is pdubsquiltstuff@centurylink.net